Integration
This is the code of your widget. Copy and paste it into the code of the pages where you want to accept payments. You must fill in the parameters yourself:
<iframe id="kassma-plugin-frame" src="https://plugin.domain/?label=label¤cy_code=currency_code&lang=lang&wallet_type=wallet_type&custom_transaction_id=custom_transaction_id&fixed_amount=fixed_amount&payment_url_success_id=payment_url_success_id&payment_url_fail_id=payment_url_fail_id&success_url=success_url&payment_url_pending_id=payment_url_pending_id&pending_url=pending_url&fail_url=fail_url" width="640" height="750" frameBorder="0"></iframe>
<script>document.querySelector('#kassma-plugin-frame').src += '&' + new Date().getTime();</script>
Attention!
Recommended integration method
Decryption parameters:
Parameters | Data type | Mandatory | Description |
domain | URL | YES | The domain name of your PA in the Paykassma service, received through the Paykassma TS. |
label | string taking into account the screening table * | YES | Unique identifier (ID) of the Customer who makes the payment. |
currency_code | string taking into account ISO 4217 (international currency classifier ISO 4217 alfa-3 (INR, USD...) maybe to give a list of currencies) | YES | Currency format that informs the plugin about the currency in which payment the data should be displayed to the user. |
lang | string taking into account ISO639-1B (international language designation standard ISO639-1BISO639-1B) | NO | Language code in ISO639-1B format. |
wallet_type | string taking into account the supported currencies of the list ** | YES | Setting a specific payment system from the list. If the parameter is specified, then the Customer opens only this PS on the plugin. In this case, it is not possible to return to the list of all payments |
custom_transaction_id | string taking into account the screening table | YES | Unique transaction identifier in the Client's system. |
fixed_amount | integer | YES | Fixed amount of the payment amount for the Customer. If passed, the user cannot change this amount in the window. When passing the parameter, only those payment systems are displayed, whose minimum deposit is less than or equal to fixed_amount, and the maximum deposit is greater than or equal to fixed_amount |
payment_url_success_id | integer | NO | Value of the additional address for the user's redirect when the payment is successful. If specified, the redirect is made to the address specified in the personal account as an additional one (from the previously declared list). |
payment_url_fail_id | integer | NO | Value of the additional address for the user's redirect when the payment is failed. If specified, the redirect is made to the address specified in the personal account as an additional one (from the previously declared list). |
| success_url | string | NO | The address for the user's redirect when the payment is successful. The address is specified in hashed form. See more about address hashing here. To use the specified address it is necessary to disable the use of addresses from the previously declared list in your personal account. |
| fail_url | string | NO | The address for the user's redirect when the payment is failed. The address is specified in hashed form. See more about address hashing here. To use the specified address it is necessary to disable the use of addresses from the previously declared list in your personal account. |
| payment_url_pending_id | integer | NO | Value of the additional address for the user's redirect while waiting for payment to be received. If specified, the redirect is made to the address specified in the personal account as an additional one (from the previously declared list). |
| pending_url | string | NO | The address for redirecting the user while waiting for the payment to arrive. |
Screening table:
Symbol | Description | Screening symbol |
! | The exclamation point | %21 |
\ | Reverse slash (backslash) | %5C |
" | Double quote | %22 |
% | The percent sign | %25 |
& | Ampersand | %26 |
' | Single quote (apostrophe) | %27 |
* | Asterisk | %2A |
+ | Plus | %2B |
- | Minus (dash) | %2D |
. | Point | %2E |
/ | Slash | %2F |
_ | Underline | %5F |
, | Comma | %2C |
: | Colon | %3A |
; | Semicolon | %3B |
= | Semicolon Equals | %3D |
< | Less | %3C |
> | More | %3E |
? | Question mark | %3F |
( | Opening bracket | %28 |
) | Closing bracket | %29 |
If an error occurs, a window with an error code will be displayed on the plugin. At the same time, you need to contact the Paykassma support service and report the error code to solve the problem. There is a table with the decipher of error codes below
Error code | Description |
|---|---|
100 | Required parameters were not conveyed |
110 | label parameter was not conveyed |
120 | currency_code was not conveyed |
Deposit using a plugin
Attention: The plugin has a dynamic layout and is adapted to work on a range of devices, including tablets and mobile phones
Example 1:
- The customer enters the payment window on the payment system selection page

- The user chooses a payment system, in the first case, let’s look at the example of entering through the PayTM payment system
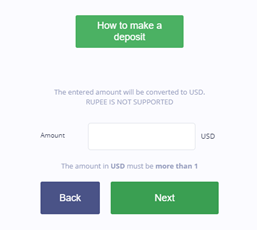
- The amount entry window is displaying
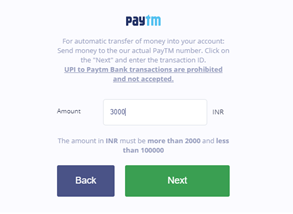
- The amount entry window is displaying
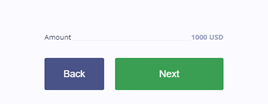
2.1 After entering the amount and clicking the "Next" button, a window is displaying with information about the wallet to which you need to make a money transfer
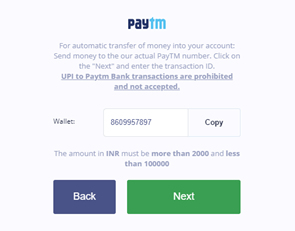
Also in the display window of the wallet, people can see an information about the minimum and maximum deposit and a hint about making a payment
2.2 Next, after clicking the "Next" button, a window is displayed in which people must specify the Transaction ID received by the Customer when performing the transfer.
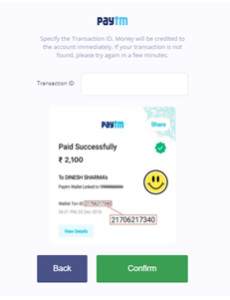
2.3 After entering the Transaction ID and confirmation, the transaction is searched in the system
2.3.1 If there is a transaction in the system, the user is redirected to the URL of a successful payment. The URL is specified in the settings.
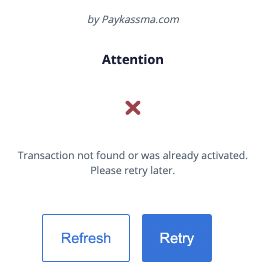
2.3.2 If the transaction is not in the system, the user will see a window with the text: "Transaction not found or was already activated. Please retry later." and two buttons. "Refresh" → the button will redirect the user to the URL of the unsuccessful payment and "Retry" → the button will return the user to the transaction activation form for a second activation attempt.
2.3.3 If the “Delayed automatic activation” functional is enabled on the server and the data confirming the transaction are not entered correctly, the following window may be displayed when you try to activate the transaction(see more about "Delayed automatic activation"):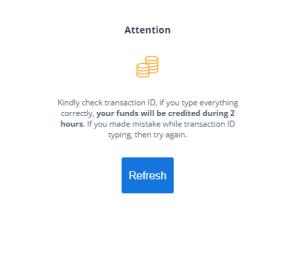
* Kindly check transaction ID, if you type everything correctly, your funds will be credited during 2 hours. If you made mistake while transaction ID typing, then try again.
When clicking on the "Refresh" button, the user is redirected to the URL of a successful payment. The URL is specified in the settings.
Example 2:
- The user enters the payment window on the payment system selection page.
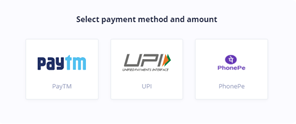
- The user selects a payment system, but not the PayTM
2.1. The amount entry window is displaying
2.2 After entering the amount and clicking the "Next" button, the data confirmation window is displaying
2.3 After confirmation, the user is redirected to the payment page
Attention: Control over transactions and their statuses can always be checked in the PA, the "Transactions" menu. This section displays the transaction generated above with the status "Activated".
Settings of the plugin appearance
To create your own theme for the plugin and/or change the size of fields in the plugin, you must create a file in *.css format and upload it through Paykassma settings (see the description of the Plugin appearance section section for details)
- Download a CSS file template (
 A link to the CSS file is available on request through the Paykassma support team)
 - Make changes according to the given examples
- Load this CSS file through the Paykassma settings
Examples of customization
Below are screenshots of the areas of influence specified in the css-file. The example shows only the most common changes in the plugin. You can go beyond them by creating more unique interfaces.
Changing the background color

Pic 1. Options for displaying the appearance of the plugin
Changing the text color

Pic 2. Options for displaying the appearance of the wallet window
Styles for first level headers

Pic 3. Options for displaying window titles
Styles for displaying the payment system

Pic 4. Options for displaying payment systems
Styles of text for the name of the payment system

Pic 5. Options for displaying names of payment systems
Changing the background color for dropdown list items

Pic 6. Options for displaying the appearance of the payment window
Styles for icon backgrounds

.app--custom .button {
  background-color: #1368d8;
  border-color: #1368d8;
  color: #fff;
}

Pic 8. Options for displaying buttons
Styles for fields


Pic 10. Options for displaying the «UPI Address» field

Pic 11. Options for displaying labels
Styles for the "Copy" button
To change the size of the Copy button, add the following code to the CSS file:
.app--custom .copy-text-input-btn {
    min-width: 62px
}

Pic 12. Options for displaying buttons
Amount field styles

Pic 13. Options for displaying fields
Card expiration field styles
The project has a plugin for the combobox. You can read more about styling such fields on the website https://jquense.github.io/react-widgets/api/Combobox/ .
Below is an example for styling it. It is currently used for the "Card expiration" field.

Pic 14. Options for displaying the drop-down list